We are open Monday to Friday
Product Hotline - 01993 704 981
Local call rate - 0208 0909586
COST-EFFECTIVE DIY SOLUTION TO REDUCE UNWANTED BASS NOISE IN A HOME STUDIO
If you are looking to convert a room into a home studio, excessive bass noise is often a problem that can be expensive to mitigate, so this article explains how you can do this with minimal financial outlay and using non-specific materials. This article is aimed at people that are proficient at home DIY, or are able to utilise someone that is.
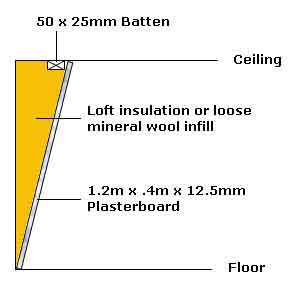
Bass is low frequency sound created, for example, by drums, bass guitar or deep sounding brass instruments such as the tuba. The longer wavelengths present in low frequency sound are less easily absorbed, so reflect off the walls. If a room has adjacent, parallel walls and right angled corners, the reflected sound waves create standing waves and room modes, and the sound amplifies, which can double the sound energy in certain wavelengths, creating an uneven sound for recording, and also making it more easily heard in other parts of the building. To eliminate these room modes, and increase the low frequency absorption of the wall, you will need: 12.5mm ordinary plasterboard in sheets 1.2m x 2.4m (4ft x 8ft), 50 x 25mm batten, fixing screws, mineral wool (loft insulation)
These instructions are assuming the room to be treated has a normal ceiling height of 2.3m because the plasterboard is only available in a length of 2.4m. The following is what to do.
2. Mark the position of the top edge on the ceiling by drawing a line.
3. Remove the plasterboard then make another mark on the ceiling 12.5mm towards the wall from the original line drawn.
4. Cut to the required length the batten and screw it to the ceiling. Plasterboard plugs may be required for the screws.
5. Fit into the void behind the batten the loft insulation. (It may be necessary to glue it to ensure it stays in place.
6. Now replace the plasterboard and screw it to the ceiling batten which should secure it in position.
7. Treat the two opposite walls in the same way then the two remaining walls. With these it will be necessary to trim the edge of the plasterboard nearest to each corner to allow for the angle now formed on the adjoining wall.
That’s it. Job done. The room is now acoustically treated to stop bass noise build up along with standing waves and all that is left is to carpet the floor and install adequate sound absorption such as our EggBox type sound absorbing foam on the walls and ceiling to help absorb reverberation and tune the room to your exact requirements.
For more information on how to acoustically treat a studio go to our web page Studio Acoustics or call us on 01993 704981.

